Showing posts with label Recipe. Show all posts

Tuesday, 22 April 2014

A Soup Maker recipe - spicy parsnip soup

Back at Christmas my gift from my mother was a soup maker.  She knows me and my love for kitchen gadgets well!

They were everywhere at the festive season and seem to be the next ‘thing’.  (Move over bread makers, cool your heels ice-cream machines, talk to the hand, cake-pop makers.)  Although I wasn't sure whether they were just a gimmick – after all – I had a blender didn't I? – I was now the proud; if slightly dubious, owner of one.  
A few days later once I was back home I cracked it out for a test run and thought I'd try an adaptation of my spiced roasted parsnip soup recipe.  (May have had something to do with the 4 bags of parsnips I picked up for 25p a go from the CFC too...)
I skipped the roasting this time as I wasn't putting the oven on for anything else and it seemed a bit unnecessary just for a few 'snips.
For some reason the post got lost in the ether but in case anyone is considering the merits of owning one of these, or have recently acquired one, I thought I‘d finally post the recipe.

Spicy Parsnip Soup, for Soup Maker machines
600ml veg stock. 
0.5tsp ground turmeric
0.5tsp ground cayenne
1tsp garam masala
1tsp ground cumin 
1 small Onion
3 sticks Celery
4 small Spud
250g (4sml + 1 larger) Parsnip
100ml water to top up + rinse spices from jug
100ml milk- to taste
100-150ml plain greek yoghurt - taste


Stir spices into stock and leave to cool.  [My soup maker insists on cold stock.]
Chop veg into 2-3cm cubes.
Pop everything bar the milk and yoghurt in measuring jug of your soup maker and check you’re within the volume limits of the machine.  (This will vary from model to model.)
Pour the contents of the jug into the soup maker and press the ‘on’ button.  I used the puree option; my soup maker also comes with a ‘chunky’ option.
Once the cycle has finished taste it.  A little thick and / or on the spicy side – add the milk and yoghurt as desired.

So 20 minutes later and ta daaa – I for one was very impressed.  Super tasty soup in a minimal time frame, especially if you’ve thought ahead and have cold stock to hand.  A short cut for that which I’ll try next time would be to make the stock cube up with a minimal amount of water; just enough to dissolve it, then top up to the required amount with cold water.*
This is invaluable for making fresh soup to take to work for your lunch – you can chuck everything in the jug the night before and just press on when you rise in the morning.  Pop it in a flask and in the colder months it was a lifesaver for this office worker in a building with no microwave!
Having not been totally sure about the benefits of a soup maker, this is a gift that has very quickly convinced me of its value amongst my kitchen gadgets.  It’s fast and it’s proving to be economical as it’s great for those ‘bottom of the veg drawer’ soups –chuck it in and hit ‘puree’.  It’s not the quietest thing in the world when it hits the blend part of the cycle but then, neither is a regular blender or FP.  I’m a firm fan!   Now, just to find somewhere for it to live...
*I've tried this since and it works a treat.

Sunday, 13 April 2014

Yorkshire puddings with wild garlic

Just a quick idea, as it's Sunday and you might be making your yorkies later for the roast.
Mix your normal yorkshire pudding batter mix.*
Rinse a handful of wild garlic (ramson) leaves under the tap and squeeze the water out.  Finely chop and add them to the batter.
 Cook as normal.  Yum!
This was an experiment as I wasn't at all sure whether the garlic would burn during the cooking process or whether the flavour would work but it was a success.  As I love garlic and don't have meat for my roasts I'd put these with anything but I'd imagine them working well with a chicken roast, and maybe lamb.
*My regular go to batter mix is 4oz plain flour, 0.5 pint milk and one egg.  There's been a lot in the media over the last year suggesting that actually these quantities should all be the same. IE by volume - crack the egg into a measuring jug and add the same amount of milk and flour (not sure how you do the flour?).  Yorkshire chef Brian Turner advocates the addition of a little vinegar for a good rise; and in fact explains the 'measure the same method' by using a cup.  (Video here.)  Pretty much all the recipes (including my own) recommend a resting period for the batter mix before cooking. Although not Queen Delia!  In fact there's a whole lot of discussion and arguing on the 'perfect' Yorkshire pudding.  See here for a little more info.
Anyway, I like to mix mine up a little by adding herbs to the batter, or try a little hard full-flavoured cheese, or wholegrain mustard.  I guess horseradish could work for accompanying a beef roast - try it and let me know!

Wednesday, 9 April 2014

Food swap - pasta with salmon and capers paste from Pantelleria

Manu from the beautiful Cooking Manu blog had the great idea of hosting a food swap for bloggers and non-bloggers alike.
I was partnered with Silvia (co-incidentally Manu's sister in law) who is based in Milan, Italy.  I sent her some local Devon wholegrain honey mustard.  I'm intrigued to see what she comes up with for that!
She sent me something new to me - capers paste.  It's from Pantelleria which she explained is an island in Sicily.  (There's a very interesting post about why capers from that region are so special here.)
Now, I was supposed to have posted a recipe using her ingredient by the 31st March but with typical 'Ruth-time' I'm just a little bit late - oops!
I played with various ideas in my head before deciding to use it in a fairly simple pasta dish.  As I'd never used it before I wanted to get a feel for the strength and depth of flavour first time round.

This made a large meal (with leftovers) for 2.

1 bag fresh pasta
2 salmon fillets (mine happened to be hot smoked ones with peppercorns)
1 onion
2 cloves garlic*
1 tsp+ dried basil
1tsp+ dried oregano
1tbsp+ capers paste (pasta di capperi)
Handful calabrese florets
Handful wild garlic (ramsons) leaves*
Little grated strong cheese, if liked
EVOO
Black pepper
Salt
*Use less garlic if you're not a fan.  I am so it tends to go in everything!

Heat a splosh of EVOO over a low heat in a decent size frying pan.
Finely mince the garlic and add to the pan once the oil is warming up.
Finely chop the onion and add it to the pan.  Sweat down for several minutes.
Get a large pan of water boiling for the pasta.  Once it comes to the boil add a generous pinch of salt and the pasta.  Fresh pasta generally only takes 3-4 minutes so keep an eye on the time.
Add the herbs to the onion pan and stir well.  If you feel the mix is drying out now or at any point you may want to add a little water - nab some from the pasta pan if so.
Add the capers paste a little at a time, stirring in well each time and giving it a minute to cook in then tasting.  Bear in mind that the plain pasta will soak up a lot of flavour.
Drain off the pasta once it's done, reserving a little of the cooking water.
Cook the salmon fillets in the pan with the onions and garlic, flake them up as they cook through.
Throw in a handful of calabrese cut into small florets and 4 or 5 minced ramson leaves.  Add a little of the pasta water now to steam the veg.
Grind in black pepper to taste and stir into the pasta.  Add a little grated cheese if liked, I felt the dish needed that extra flavour to balance the salty umami notes from the capers and the strength of the garlic.
Serve and enjoy.
 This was delish and gave me a good idea of how the capers paste works in a dish.  It certainly has a big flavour but also seems invaluable for the umami notes.  I can see this having an incredible affinity with good tomatoes and black olive tapenade on some fantastic bread...Mmmmm...

Wednesday, 20 November 2013

Mash? Smashed it!

Apologies for the cheesy title but I'm kind of excited by my discovery this evening.  Mash can be nice!!  Good - even tasty!!!  I have always disliked mash; there's no texture, there's no taste, all too often it's too watery and just insipid and all round uninspiring.  To me it has always been the lowest form of cooked potato to eat.
However - as I mentioned I have had something of a epiphany.  I was making mash to top the Chaps cottage pie with (heroic meat cooking by the faint hearted I reckon) and I played around with it a bit and found - The Perfect Mash.
(Imagine a little musical 'ahh ah aaahhh' at this point if you will.)

Do you want to know the first secret?  Do you??

Don't boil the potatoes.

Ahaa - boiling them just introduces water into a; by necessity, floury potato.  It's floury nature means it will soak it up = rubbish mash.
A note here - you need a decent spud too, if that's not too much of an obvious thing to say.  Mine were local Desiree's bought complete with the dirt on from the local grocers.  A good spud should taste nice already, even before we add the magic.
So - if we're not boiling the spuds what are we doing with them?  Some people advocate baking them which is fine if you already have the oven on for something else, but if all you want is a bowl of mash it seems a bit long winded to me.  So - I microwaved them.  Scrub clean then prick the skins well with a fork - they'll explode if you don't!  I had two monsters - over 600g between them.  Microwave for 5 mins, turn over, cook for another 5 and prong with the fork to test if they're done.  If not give them another couple of mins.
Once they're cooked slice open in half to help the steam out.
With a fork to steady the spud (they are hot!) scoop the innards out with a spoon into a bowl.  Roughly mash with the fork.
Add 2 big spoons (about tablespoons) of Greek yoghurt and 2 of horseradish sauce.  Some salt and pepper and a small knob of butter.  Mix in well but endeavour to keep some texture to the mash.
Taste.
Marvel.
I have a lot of catching up to do on a lifetime of spurned mash...

Tuesday, 19 November 2013

Easy chunky fish chowder

Having taken some fish snaffled up from the bargainous CFC out of the freezer yesterday  with the intention
A mere £3.75 for all 4 fish fillets.  :-)
of making my crunchy topped fish pie, I realised tonight as I got home late from work that I really just could not be bothered.  So - what to do with the fish?  A nice chowder would suit the freezing outdoor temperatures nicely I figured, and should be easy to knock up.
Atypically for me I didn't then embark on a 2 hour research project comparing the relative merits of each and every recipe on the interwebs but I adapted this one from the BBC good food website and made it even easier and chunkier.

Chunky Fish Chowder
EVOO
2 sticks celery - diced
1 leek - sliced then the rounds sliced in half
500g spuds - diced small as I didn't bother peeling them.  I used waxy spuds as that's what I had and what I prefer
1 litre fish (or use veg) stock
Skinning salmon is easy, cod - not so much!
Zest of 1 lemon (if you haven't got a lemon in the house feel free to leave this out - I wasn't convinced you could taste it in the final product tbh)
1 tsp cornflour
2 salmon fillets (my pack was 260g) - skinned and cut into chunks
2 cod fillets (my pack was 220g) - skinned and cut into chunks
300ml full fat milk
150g sweetcorn - defrost if frozen
2 heaped tbsp Greek yoghurt

Soften the celery and leeks in the EVOO for 5ish mins while chopping the spuds.
Add the spuds, stock and lemon zest.  Bring to the boil then reduce to a simmer.
Stir the cornflour into a small amount of cold water and add to the pot.
Once the potatoes are soft (up to 15 mins) use a masher and crush them into the soup a bit.  How much is up to you.  It saves getting the FP out though!
Add the milk and sweetcorn and warm up.
Add the fish and cook gently for a few minutes until done.  Don't boil or the fish will fall apart.
Serve - I put a little more lemon zest on mine.  The original recipe suggests chives but I didn't have any.
Tasty, easy and filling, I enjoyed this greatly.  Helped warm me through too.  :-)
As I'd used reduced fish it was a cheap dish for me to make and I just used veg that was to hand, so no need to shop especially for this dish.

Saturday, 16 November 2013

Quick, tasty & frugal - Tortilla Española (Spanish Omelette)

I wanted to whip up a quick lunch yesterday and was going to make an omelette when I remembered there was half a *tins worth of potatoes in the fridge to be used up.  I love Spanish Tortilla so it was a bit of a no-brainer decision what to do with them.
This is quick, easy and cheap yet satisfying and a bit more of a meal than just an omelette would be.  In fact really this makes enough for a snack later too.  As the Spanish generally advocate serving it at room temperature this is most definitely not a problem for me!
So - what do we need?

1 small onion, halved and sliced finely
Half a tin potatoes- use the value ones
2 eggs
EVOO
Fresh parsley
S+P

Heat a slug of EVOO and sweat down the onions whilst you slice the potatoes.  You can make them thick or thin - it' a matter of personal choice. I've seen recipes for both ways on line and they all claim that theirs is the 'authentic' way of doing it.
Add the potatoes and a pinch of salt and cook gently, half covered, until nicely softened, getting a little colour and taking on all the lovely oniony flavours.
Beat the eggs, add plenty of salt and pepper and pour swiftly into the pan.  Throw in the chopped parsley and give the whole lot a very quick stir so everything is coated in the egg, then cover and leave to cook.
Once you judge the bottom is cooked through, cover the pan with a plate and quickly invert the lot, then slide the tortilla back in to finish cooking.
Serve.  That's all there is to it.  J
You could add other bits to this depending on what you have lying around to use up.  You could also add another egg for an even more substantial final product if wanted.  It's one of those very un-strict recipes.  Have a play with it!

*I don't normally use tinned potatoes but had wanted to experiment with them for my lunch at work.  Our work kitchen is woefully under equipped - there's a coffee maker and a boiling water tap and that's it.  No microwave, toaster, kettle, anything of that sort.  This can make it a bit of a challenge (and one I embrace) to come up with hot food for lunch in the winter.  One day I might get round to a mini-series of posts on 'cooking without a cooker' or something along those lines.

I'm adding this to Chris's Bloggers Around the World - Food World Cup challenge.  Do check it out - there's going to be a lot of posts for this one!


Wednesday, 25 September 2013

Meat Cooking for the Faint Hearted #6 - Bacon and Beans

This is the kind of warming dish I've wanted to try out on/for the Chap for a while now.  I finally made it prompted by my bargain purchase of 3 tins of cannellini beans for 99p at a newly opened 99p store close to
Flanked by some other bargains.
2 packs of the tuna fillets - 99p and
garlic salad 99p.  :-)
us.  This makes it tick the 'frugal' box and the usage of whatever veg you have in that needs using up makes it even better as a cheap meal.
I did a little scooting about on the t'internet and came up with the below; mostly influenced by and adapted from this recipe.

Bacon and White Beans
Lump bacon - you can get cheap mis-shape packs in S'burys and butchers.  (I forgot to weigh how much I used but you can use rashers instead, as much or as little as you like / your pocket dictates.)
1-2 cloves garlic (to taste)
1 small onion / half a whopper (that's what I had)
1 carrot (or a stick of celery or both)
1 can beans - drained and rinsed (I used cannellini but white beans of your choice will do)
250ml stock (I used veg, you could use chicken if you have it)
Black pepper
Sprig Rosemary
1 bay leaf

Chop the bacon into lardons or leave whole if using rashers and chop after cooking.  Fry off the bacon in a heavy based pan - I used my cast iron one person sized casserole.  Fry until crispy then remove but leave the fat in the pan.
Add the sliced and rough chopped onion, minced garlic and the diced carrot and cook for a few minutes until softened.  (I used carrot as I didn't have any celery in the house but use both or either or neither -it's not a real picky recipe.)
Add the beans and bacon and cook for a couple of minutes whilst you nip outside and get the herbs - these are mine by the front door.  Or use dried of course.  :-)
Scrunch up the bay leaf a little and chop the rosemary finely if using fresh.  Add to the pan with plenty of freshly ground black pepper.
Add the stock, stir well and whack up the heat to bring to the boil.  [At this point I realised I forgot the garlic so chucked in a good half teaspoon of garlic granules instead.  Doh!]
Reduce the heat and simmer covered for half an hour, stirring occasionally.  Then uncover and simmer for up to a further 30 minutes stirring more often to ensure it doesn't catch on the bottom.  It may not need the full 30 but do it for as long as it takes to get to a nice sticky consistency.  Adjust this to your preference, leave it more soupy if you like, everything's well cooked by now.
Serve with some fresh greens on the side and watch the Chap wolf it down - he professed it to be lovely and ate the lot at one sitting!  :-)
I had to entrust the Chap with taking this shot but to be fair, this kind of meal is never going to win any 'pretty' awards!


Wednesday, 1 May 2013

Overdue Avocado - Fruit No Waste Food challenge

Using up fruit was this month's No Waste Food Challenge hosted over at Elizabeth's Kitchen for Kate at Turquoise Lemons.  Now it may seem strange but we don't often have fruit that needs using up; I'm more of a 'when I want it I'll go and buy it and eat it there and then' kind of person when it comes to fruit.  A large swathe of the recipes out there for using up fruit seem to focus on bananas as well and as I can't stand the smell of them (it makes me nauseous) they aren't allowed in the house!
However - one fruit I occasionally forget about and then have to use up is avocados.  I love avocados; and I know they're a love it or hate it kind of thing, I think primarily because of the texture for a lot of people.  What I don't like is the whopping price tag stupormarkets seem to put on them, especially when they're often half the price in Aldi or the greengrocers.  As they're massively high in calories too I tend to just have them as an occasional treat.  I will get them when they're reduced on the CFC with the good old yellow sticker on but I find that they're invariably still too hard to eat so have to be stashed for a few days to ripen and soften up.  This is when I sometimes forget about them and end up having to chop some of the more brown portions out meaning any ideas of a pretty fan of slices for presentation has gone out of the window.  (I know, I know - how very 70's eh?!) 
So - a recipe where the avocado makes it's appearance in chunks or mashed would be a good one to utilise.  The obvious one is guacamole which I love but I fancied something different.  A warm cheesy treat on toasted bread... I give you - the avocado melt.  :-)
If you have any 'overdue' avocados to use make sure to chop any brown / black bits out as they will ruin the taste otherwise.  Just use the green bits.  Mash them with some grated cheese to your taste - I use mature cheddar for preference.  Season with some ground black pepper and a little splash of lemon or lime juice if liked.
Toast your bread - I use seeded wholegrain style stuff.  Spread liberally with the avocado and cheese mix and sprinkle a little additional cheese over the top then grill until melty and lovely.  Easy unctuous goodness packed with nutrients that would otherwise have gone in the bin - what could be better?  [Apologies for the lack of photo - having probs getting it off the card.]  If you have a couple of sad mushrooms or a tomato lurking in the fridge to use up then give them a quick slice (and cook in the case of the sh'rooms) and pop them on the toast before covering with the avocado and cheese.  This guy has some other ideas on the same lines.
There's info on the nutritional value and loads of recipes on this site amongst others   Apparently they're not as high in calories as I thought according to that site so if only the price would come down I'd have them more often.  :-)
Another of my fave ways of using up avocados is this lovely avocado and lime ice-cream I made before.  Do give it a try - it's waaay nicer than you might think if you've only had avocados as a savoury item before.


Monday, 1 April 2013

'Baking' for insomniacs - quick (non-baked) breakfast muffins

By muffins here I mean English ones - hence the 'breakfast' in the title - not the overpumped cake mix ones that seem to come in childs head sizes nowadays.  Ooh wait - I had this rant before right?
This recipe also isn't technically baked but it was made at some godawful hour of the morning. Just gone 5am really but as we switched to BST yesterday technically it was just after 6am. Either way my brain was WIDE AWAKE so that was that.
Now this month I have been tardy with my blog challenges – random recipes should have been in 2 days ago although in my defence it was with some surprise I realised it was April 1st today and not March 31st – oops! One of the other challenges I like is Turquoise Lemon’sNo Waste Food Challenge’ which for March was hosted by Elizabeth’s Kitchen and had the theme of eggs.
 One of the *freebie books I downloaded to my kindle some time back was the intriguing ‘Many Ways for Cooking Eggs’ by Mrs S.T. Rorer, a book from the late 1800’s / early 1900’s written by the cook for a substantial household it seems, and I think, in America. It’s one of those old books that have been converted to a digital format by volunteers who don’t want to lose these historical records. I’m fascinated by old cook books as much for the social history they tell you as for the (sometimes hilarious) recipes and thought I’d have a quick skim through that in search of an intriguing egg recipe. Although it’s packed with really random ways to serve eggs they all seemed to take the form of ‘make a sauce with X in it, hard boil / shirr etc your egg. Serve on sippets of toast in a platter and cover with the sauce and send to the table at once.’ Not really the inspiration I was looking for. Until I happened upon the ‘Eggs Benedict’ recipe and saw that it gave a quick muffin method that’s then cooked on a flat griddle on the hob. This was more like it. So – quick non-baked breakfast muffins it is for my entry (if they’ll still let me link in) to March’s egg themed no waste food challenge.
Made 8 muffins
2 eggs
1 cup milk
1.5 cups plain flour
0.5 tsp salt (after tasting the first one I’d up this to at least a full teaspoon)
1 tbsp melted butter
2 tsp baking powder
 >I then also added 0.5 tbsp wholegrain mustard to the mix for 2 muffins and a whole lot of ground pepper and some finely grated strong hard cheese to the mix for another 2.

Separate the eggs. Beat the milk into the yolks, then sieve in the flour bit by bit and beat this in. Add the salt and butter and beat in. Finally beat in the baking powder. The recipe calls for level teaspoons; my BP was out of date so I used slightly rounded ones.
In a separate bowl beat the whites vigorously – I did mine by hand and got them to what I believe would be called ‘soft peaks’. Fold them into the yolk/flour mix.
Cook in very well greased muffin rings on a griddle. I don’t have a griddle so used the frying pan I know has the most even heat distribution. Added a little olive oil and keep re-greasing the rings between batches; due to the size of the pan I could only do 2 at one.
The mix rises as it cooks – if you overfill the rings it will spill over the top! Oops!


About 2/3 full is right I found. Once the underside is nicely golden brown and the mix has risen ease a small knife around the inside of the ring before turning the whole thing over. Then carefully using a glove/ cloth etc ease the ring off – you’ll need to use something like the handle of the knife to press the muffin out from the ring at the same time.

>Once I had the second batch in the pan I split what mix was left and added the wholegrain mustard /cheese and pepper as mentioned above so had 4 plain and 2 in each flavor. I used to love the cheese and pepper muffins S’burys used to do so this is very exciting for me! You could also try adding a pinch of herbs or spices too – endless possibilities.

I had a plain one with a little cheese melted on. Very good indeed and pretty quick and easy – in fact it’s the cooking that took me the time – and cost me a few burnt finger tips – be careful breakfast buddies!
*It’s now 77p. In my version this recipe is 52% of the way into the book.


Thursday, 28 February 2013

Another challenge recipe - Marmalade & Carrot Ginger Spice Bread

You'd be forgiven for thinking I'd gone blog challenge mad.  I've just realised that 4 out of the last 5 posts are linked to challenges.  This one's no different either!  It's been a bug I've been getting recently as it's been inspiring me to cook and try out different things so that must be a good thing yes?  There's some belters out there; sad to say I don't have the time to do as many as I'd like what with having to work (booorrring) and all but in the process of looking up different things to do you often stumble across interesting recipes, techniques and ideas.
This is one of those cases.  Whilst hunting down who originally wrote the marmalade ice-cream recipe I wrote about yesterday I saw a mention on a blog post of marmalade ginger bread.  This intriguing idea led me on a hunt round the t'internet to find a definitive recipe and also - whose it was.  This last is difficult as I've found exactly the same recipe several places but here seems to be the earliest.  I've adapted it but that's the base original.  I adapted it primarily because I wanted to use up some carrot (left over from the stuffed carrots I made for random recipes) and replace some of the flour with wholewheat.  I then discovered I had less golden syrup that the recipe called for so upped the amount of marmalade in it's place.  I also changed the spices and if I made it again I'd change them more. 
So for Turquoise Lemons' Preserves No Waste food challenge here's my unplanned yet snappily titled:

Marmalade & Carrot Ginger Spice Bread
75g butter
115g golden syrup
75g lemon marmalade
185g orange marmalade
100g carrot
50g wholewheat flour*
175g SR Flour
0.5 tsp BP
4tsp ground ginger
1tsp ground cinnamon
1tsp ground all spice (If you don't have this use 0.5tsp nutmeg and 0.5tsp clove)
1 large egg

Preheat oven to 170˚ / 160˚ on a fan oven.  Grease and line a tray / tin.
Melt the butter, golden syrup and marmalade together. I did mine in the microwave in a pyrex jug, heating for a minute at a time to avoid any boiling jam splashes.
Grate the carrot into a mixing bowl.
Sift the dry ingredients into the bowl on top of the carrot.  When you get to the end of the sifting and have all the wheat pieces left from the wholewheat flour give everything a last press to ensure any lumps of spices or flour are through the sieve then tip the wheat in.  We're sifting to add some air but don't want to lose the goodness brought by using some wholewheat flour.
Stir gently to coat the carrot in flour so it doesn't clump together then make a well in the centre.
Pour the melty butter, syrup and marmalade mix in and gently fold in.
Beat the egg (use the same pyrex jug - saves on washing up!) and add to the mix.  Fold in gently again so we don't lose all the lovely air.  You should have a batter that is slightly runny, but not totally liquid; a gloopy sort of consistency.  At this point I will mention that all of the recipes I saw also called for 'a little' or 2tbsp milk or warm water at this point.  I'd imagine if you're using a smaller egg maybe this would be needed but my egg was pretty big so I didn't feel extra liquid was necessary.
Pour into your tin/tray.  I used an 8" x 12" tray.
Bake.  Mine took 40 minutes in this tray.  Some recipes quoted up to an hour if using a smaller tray or a tin; therefore a greater depth of cake.  It's done when a skewer pushed in comes out clean - though do be aware it could hit a spot of marmalade so it's worth doing it in 2 or 3 different places.  The cake itself will be a nice golden brown and should spring back when pressed gently in the centre.
*I used 50g only of wholewheat flour as I hadn't made this recipe before and was already changing it with the addition of the carrot so I was wary of making it too heavy.  As it is the bake has come out moist from the carrot but stayed light and airy so you could add up to 100g I think and it still be a good light bake.  Don't forget the baking powder though!
Apparently like gingerbreads normally are, this is one of those bakes that improves after time; 3 days being the quoted timescale.  Having tried it fresh my current impression is that I'm inclined to switch the spices round more next time by swapping out some of the ginger.  At the moment the marmalade and general spices come through first then the ginger follows which seems a little unbalanced to me. However, I will come back in a few days and tell you how it is then.  As I did end up using less golden syrup and more marmalade than originally planned this may have tipped the balance of the flavours.  All in all I'm pleased though as it's stayed light, it's tasty, and it used up some odds and ends of marmalade and excess carrot innards.  :-)

Wednesday, 27 February 2013

Marmalade Ice-Cream, a No Waste food challenge

There's a No Waste food challenge set up over at Turquoise Lemons new for 2013.  Inspired by the 'love food hate waste' campaign Kate has come up with the spiffing idea of picking a common 'leftover' as the ingredient each month to use up.  This month's theme is preserves.  So I humbly offer - marmalade ice-cream.  I have adapted the original recipe but this came from the Observer Magazine colour supplement sometime in the late 90's; I think most likely to be '95-'97 but that's based on where it appears in my little notebook in comparison to where others are against my memories of what was in there when I went to uni and what got written in later.  If that makes sense.  So with appropriate thanks to the original author* this is my adapted version.  I feel the original recipe which just used orange marmalade and cream could be a little too rich so I use lemon or lime marmalade, or both, plus fresh zest and juice to zing it up.  It will depend what you have in that needs using up though.  This recipe uses nigh on a whole jar.  It's super easy to make and pretty quick; it's also pretty cheap, especially if you get the fruit on Aldi's super 6 or just get the cream only.  Massively unhealthy so enjoy in moderation!
*With thanks to Phil in the comments I am now sure this was originally a recipe of Sophie Grigsons from 'Sophie's Table'.  Originally published in 1990 it seems to have a second edition in '98 so I'm guessing that's when and why her recipe was in the mag I saw it in.

375g marmalade - this time I had lemon to use
2 limes
300ml double cream

Put marmalade in a bowl or - I used the container I will freeze the ice cream in.  This recipe makes one of these standard litre-ish sized containers full.
Zest the limes in then juice them really well into the bowl / container.  I use the 'microwave for 10-20 seconds then roll on the counter top' method before cutting the fruit open to get the most juice from lemons and limes.  Squish the pulp in too - it all means more flavour and less waste! 
Remember that frozen foods dull the taste sense which is why recipes always call for more sugar and more flavour than you'd think in ice-cream.  So don't be worried if you think it's too limey - it needs it.
Beat the cream until stiff - I used my FP here, bit easier on the arm muscles!
Fold it into the marmalade.
Freeze. 

That's it - none of that beating every few hours to keep the crystals small.  Every time I've made this previously I haven't and it's turned out fine, I think because you whip the cream and marmalade first.  It can be a little on the firm side so I'd advocate removal from the freezer 10 mins before serving.**  Yum!

**Edit - it wasn't nearly as solid this time, I think because I used the whisk on the FP where I've done it by hand before so it was undoubtedly better beaten.  As it is now I wouldn't stand it for any time, and 10 mins would make it a bit too melty!

Random Recipes - Wartime Stuffed Carrots

This months Random Recipe theme from Belleau Kitchen was a DIY based idea - you could pick the book yourself to choose your recipe from.  I immediately got my selection of slightly more 'historical' books out.  I find these fascinating not just for the recipes (and the veg cooking times - my god the horror!) but also as a social commentary of the time. 
One of these is a little more tongue in cheek - 'Mrs Cook's book of recipes' professes to be dishes that an 18th century sailor may have been familiar with but I'm not entirely sure some of it isn't a bit less than genuine.  Anyway, having already discarded the 1940 Be-Ro book that I inherited from my gran's kitchen (a famously poor cook according to my mother) I opened 'Mrs Cook's' at random.  Otter Meat.  Seriously. 
Perhaps my 1939 copy of 'Cooking with Elizabeth Craig' could be of more help?  I ruffled the pages past and... Roast Capercailzie.  Eh?  Besides a very vague knowledge that this is a bird of some kind I was a bit lost.  Was there a more helpful recipe on the facing page?  It's... Roast Blackcock.  Er no, not really more helpful then. 
Perhaps this idea of mine to use these old books wasn't so hot as it seemed like I wasn't going to be able to get the ingredients?
I hadn't even opened my 1968 version of the classic 1932 'Good Things in England' yet - a fantastic book where Florence White, on becoming concerned that many regional specialities were being lost set up the English Folk Cookery Association and collected them into this book.  It's available as a reprint now and fab.  However I'm well aware it includes things like 'Rook Pie' and recipes for Elvers (Baby Eels) and I'm thinking I'm doomed!
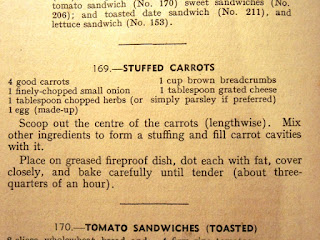
Then the Chap pipes up - "where's that war one?  By that woman?"  By this I know he means the 'Health For All Wartime Recipes' book.  This is written by one Margaret Y. Brady who was a 'diet reformer' ie vegetarian back then.  She comes across as somewhat crusading, didactic and a leetle bit of a scary lady.  The Chap as a confirmed carnivore finds her hilarious and quickly plucks the book from me to open and laugh at what he finds within.  'Stuffed carrots' he chortles to himself, unwittingly having just picked my random recipe.  So - stuffed carrots it is!
Scrape out the insides of your carrots - I carefully picked some monsters to use for this.  Mix breadcrumbs, finely chopped onion, fresh herbs, a little grated cheese and one egg - 'made up' the recipe states. 
Thankfully I can use fresh.  I also added some salt and pepper then dotted with butter and baked for the requisite 45 minutes. 
Well - it is what it is.  Eggy bready filling baked in a carrot.  There was a lack of flavour in the stuffing despite me 'accidentally' doubling the cheese included.  The herbs came through but I think as a concept dropping the bread and using some mushrooms in a wine and red onion reduction or something along those lines would be better.  Also depending how soft you like your veg I'd be inclined to drop at least 15 minutes off the cooking time.  It's a cheap recipe to make but actually TBH I'd be inclined to just not make it again really.  Oh - and carving the insides of your carrots out is a right old faff.  If you should wish to try something like this use a knife you (or in fact the Chap) has broken the tip off of as this helps as a digging out tool.  Or possibly a chisel.  :-)
So - this random recipe was edible but not really massively appealing.  It has renewed my interest in trying out some of these old recipes though.  Possibly not the otter meat one however...

Sunday, 17 February 2013

Themes of wild garlic pesto

3 weeks back the Chap and I went for our first forage of the year and were pleased to see the wild garlic sprouting already. We’ve been meaning to go back since but have variously been deterred by rain, being busy and watching the opening 2 weekends of the 6 nations rugby. So today, it being reasonably sunny (though very windy) and lacking in rugby fixtures we made the trip and found a lot more of the garlic has come up.
As a contrast this is the same area I pictured last time, you can see many more of the shoots have unfurled properly, and the river has taken its rightful place within it’s banks again! There were also plants all the way along this stretch that weren’t in evidence last visit so we should have plenty to keep us going this year.
So we stocked up and came back with about 300g of the stuff. We’re wild garlic pesto aficionado’s and made a few batches once we got home trying out using hazelnuts as well as the standard pine nuts and adding lemon juice to some. I think the lemon juice really lifts the mix and I’m a big fan of that version. Otherwise I did prefer the pine nut version to the hazelnut one. I also made one batch with half basil and half wild garlic as I had some fresh basil in the fridge to be used up which was lovely. So with this many herbs I’m going to enter this into this month’s Herbs on a Saturday over at Lavender and Lovage. Having just nipped over there I’ve also found that serendipitously this month there is a mini-theme of foraging!  :-)
We’ve adapted our pesto from the HFW recipe in his Hedgerow book which incidentally is a good read as are the seashore and mushroom ones in that series.

Wild garlic pesto and variants thereof - for a small batch that fills a 200g-ish size jar:
50g wild garlic, rinsed well of any mud etc
30g pine nuts / hazelnuts
30g parmesan / veggie version
80ml olive oil + a little extra
S + P
10ml lemon juice – if using
Toast off your nuts gently. Pine nuts I do in a dry pan, for the hazelnuts we added a little oil as they’re less naturally oily than the pine nuts.
Rough grate the parmesan and place it, the nuts, garlic and salt and pepper in your FP and blend.
During blending pour in the olive oil. Taste and adjust, it may need more salt than you think to bring the flavours out but it’s always best to err on the side of caution to begin with.
With the motor running once more add the lemon juice. You can do this in 5ml increments if you want until it’s pleasing to your own taste. I made one batch deliberately more lemony as that’s my favourite.
Pour into a sterilised jar and tap sharply on the counter top to encourage it to settle and remove any air bubbles.
Lastly drizzle a little more oil over the top to ensure it’s sealed from the air then store in the fridge.
For my basil and garlic version I had just over 25g of basil so just made it half and half with the garlic and used pine nuts and the lemon juice. We had some straight away on a hardboiled egg with a little sea salt sprinkled on and it was divine!
This is also very good with cheese and crackers, stirred through pasta or one of my favourites – smeared on top of the cheese on toast before grilling to melt the cheese. I think it could also work with spinach and feta in a pie, drizzled into the top of soup, tossed with new potatoes for a salad; there’s a myriad of uses.
If you have a patch of wild garlic local to you this is well worth making and works out pretty cheap. The garlic is nuppence and although pine nuts and the cheese are more pricy you only use a little of them. Try it and you’ll be a convert too!!